Saturday, March 26, 2011

Carter's Mickey Mouse Birthday Party Project #2 - Mickey Mouse Wreath

For Carter's Mickey Mouse birthday party, I wanted to make something cute to hang on the front door, but I was out of ideas.  I needed something easy and inexpensive.  I was lucky enough to run across this tutorial on Serendipity (Cristin has such a fun blog - be sure to check it out!), and I decided to make a tissue paper wreath.  I purchased the Martha Stewart fringe scissors that she recommended (on Amazon), and they made this project SO much easier.  Now I'm looking for other things to use my scissors on!

Here are some pictures of my completed wreath.  I embellished it with some die cuts that I purchased on Etsy (very inexpensive) but you ladies lucky enough to have a Silhouette machine or a Cricut could make your own.  I also added a paper-covered letter "C" (used Mod Podge to cover it) and some coordinating ribbons.  Total time spent on this project was around a couple of hours - super easy!


Now I'm thinking of so many other possibilities for these cute wreaths.  I am going to make an Easter one next.  Let me know if you make your own, I would LOVE to see them!


More easy and inexpensive projects to come, as well as full party details and pics.  Thanks for letting me share!

Sharing here:
Visit thecsiproject.com
UndertheTableandDreaming Photobucket

Friday, March 25, 2011

Carter's Mickey Mouse Birthday Party - Project #1

We just recently celebrated our little Carter's 2nd birthday.  I'll be honest here and say that I haven't quite had my normal crafting "mojo" lately.  I normally go ALL OUT for every party, including lots of different DIY projects, so this is not normal for me.  Right after my miscarriage, I started getting really bad headaches, and have suffered since then almost every day.  I've been having some other pretty scary symptoms as well (numbness, dizziness) so I've pretty much worried myself sick.  I have been to several doctors, and will be getting an MRI done on Monday.  I'm honestly scared to death about this MRI, but I've been trying to distract myself as much as possible, and making things has always been therapeutic for me.  So, since my little man needed some special decor for his BIG day, I made a few little goodies that are very inexpensive and easy.  Just thought I'd share a few of my projects over the next couple of days, with a full party post coming soon!

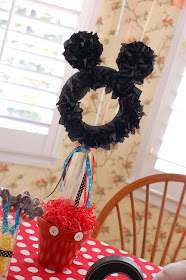
My first project was this cute Mickey Mouse topiary.  I found the three styrofoam pieces at the Dollar Tree ($2 total for all three pieces), used a clay pot from Michael's ($1.67),  a dowel from WalMart ($ .37) and had red and black spray paint, black tissue paper, ribbons and paper shreds already on hand.  So, my total cost for this project was just under $5 including tax - can't beat that!


All I did was glue the styrofoam pieces together, spray them black (note - styrofoam doesn't take spray paint very well - it starts sort of eating away at it.  You should use a light coat if you are going to do this), hot glue the dowel into the bottom of the "Mickey" shape, and then stab it into the floral foam in the pot.  I then cut a bunch of pieces of black tissue, added some hot glue to the back of them, and stabbed them into the floral foam using a pencil eraser.  I added paper shreds to cover the floral foam in the pot, and then glued two white paper circles to the front to look like Mickey "pants."  For a finishing touch, I tied on some ribbons that matched my other party colors (red, black, aqua and yellow).  Easy, and very cute!

More projects to come, including an easy party wreath, some fun "subway" birthday art, and an amazing banner made by my mom!

Sharing here:

UndertheTableandDreamingPhotobucket

Sunday, March 20, 2011

More Baby Gifts...Mod Podge and Chicks!

So yesterday, I shared my sweet little cupcake baby gift (if you missed it, click here), and promised to share what else I was sending to my sweet friend "down under" for her baby's nursery.  She chose the "Penelope" bedding from PBK, and I wanted to come up with something to match it.  Unfortunately, my budget was pretty tiny, so I used some things I had on hand to make a sweet frame for her baby girl's picture.  I think it turned out really pretty!

I used a frame that I purchased at a craft store (can't remember which one, but I am pretty sure it was JoAnn's - the great thing about this one was that it was already painted white - yay!  Saved me a step!)  I simply shopped my stash of scrapbook papers, and found one that matched perfectly with the bedding.  I used my trusty Mod Podge to apply the paper, and then sanded the edges off a bit so they would look more flush with the edge of the frame.  It looked sort of plain, so I made a couple of fabric flowers.  If you don't know how to make these, search "fabric flower tutorials" on Google and you'll find a ton of them!  I added a few feathers and some tulle (the key ingredients in all things girly, in my humble opinion) and voila!  A cute frame - for under $3 or so! 
See how pretty it looks with her bedding?


Next, I decided that I needed to send my friend's older daughter a little gift (after all, a soon-to-be big sister needs a little recognition!), and once I found these A-DORABLE Easter chicks at Hobby Lobby I knew  I  she had to have them!  I previously professed my love of these darn chenille chicks here - but I'd never seen all these colors until this year!  Love!!!  (See Jessica - I found blue ones - yay!!!)  I added a little note for the new big sister, and put them in a tiny pink lunchbox that I found in my craft stash.  What's that?  You don't have a tiny pink lunchbox in your craft stash?  Hmmm...maybe I do have a problem! Haha!

It looked too plain for me, so I had to add another fabric flower and some little felt leaves that my mom made for me - thanks Mom!


Look at ALL that cuteness!!!!!


The finishing touch was a little "chick" onesie and another little bib, rolled up and placed in a clear cellophane bag.  It's all in the presentation, don't you think? 
I hope my friend loves these little goodies as much as I loved making them.  And I hope she doesn't read my blog!  Georgie, if you are reading this, just don't tell me - I am hoping this will be a big surprise!!!!

Sharing at some great link parties:

MakingPhotobucketUndertheTableandDreaming
this blessed nest

Posted by Picasa

Friday, March 18, 2011

Thank you! And a Sweet Baby Gift...Part One

Hi friends!  I wanted to start off this post by thanking everyone, from the bottom of my heart , for your kind words regarding my miscarriage post.  Your thoughts and prayers truly helped carry me through some of my darkest days.  I am still dealing with the loss, and I definitely have some hard times, but I am slowly finding my way out of the well of sadness I found myself in when I wrote that post.  Thank you for sharing your stories and for praying for me - I truly appreciate it more than you could ever know!!!  I have some more thoughts to share, but I need to organize them in my head before I type them out.


Today I have a "sweet" idea to share for an inexpensive but oh so adorable baby gift. This is not my original idea, but this is just my take on it. I've seen these all over blogland and on Etsy, and I knew I could make my own! I actually shared a similar project here back in October.  I guess I really like cupcakes!

I did some shopping for a friend who lives in Australia and who is having a baby girl.  She wanted some bedding and decor from Pottery Barn Kids, and PBK doesn't ship to Australia.  The nerve!  As I was packaging up her goodies, I couldn't resist throwing in some sweet little things for her sweet little Annabel.  So, since I took an insane amount of pictures of my little creations, I thought I'd share this idea with my blog friends.  I am not doing a full tutorial, since this is pretty self explanatory, but I'll tell you quickly how I did this.

You will need:

  • Onesies/socks/burpcloths/bibs - whatever you choose. For this example, I used a onesie and a bib.
  • Cupcake liner
  • Cupcake box with insert (I bought mine at Hobby Lobby)
  • Hair clippie (or other item for topper - more ideas below)

What you will do:

Simply roll up the onesie (or whatever the larger item is you chose from the list above), and then roll up the bib around the onesie. You might need to adjust this a little bit, until it looks like a cupcake! I've seen these with all sorts of things in them - little socks sticking up out of the middle, washcloths, bibs, shirts, etc. The key is to get something that is not too bulky, otherwise it won't fit in your cupcake liner.  Once you have a shape you like, put a rubber band around your cupcake so it will stay together.  I recommend the little clear ones that are typically used for little girls' hair, but I didn't have any of those (actually, we probably own 10,000 of those, but I couldn't find any - big surprise!) so I had to use a regular old rubberband - I just hid it well (see how the bib edge is sort of folded over below?).

Next, you will need to add a cute little topper. For mine, I chose a little clip I made, and I just clipped it on to the onesie. I have seen little hair bows, even fake cherries and strawberries on these. Use your imagination for this part.


Finally, place your little cupcake in its liner, and then in the box - how easy was that?!?!? This is definitely a stand out gift at any baby shower - you are sure to get lots of "oohs" and "ahhs" over this little cutie.


Tomorrow, I'll be sharing what else was in my package sent to my friend in Australia - here's a hint - it involves Mod Podge and Easter chicks - interesting, no?

Sharing at some great link parties:

MakingPhotobucketUndertheTableandDreaming 
Visit thecsiproject.com


Posted by Picasa