Thursday, September 30, 2010

Halloween Trick or Treat Wreath

It's me again!  With more Halloween!  I know ya'll think I'm crazy, and I'd be inclined to agree with you.  However, I can't resist sharing this cute wreath I just made.  After I drug Carter to Hobby Lobby to get the wreath form (around $3.50), I had this thing made in less than an hour during naptime.  It was that easy!  I'm not going to do a full tutorial since I didn't take "in progress" pictures, but I'll tell you really quickly what I did.


First, you are going to need the mesh stuff - it is called "Poly Deco Mesh" and is hard to find for me locally (Hobby Lobby carries some in Christmas colors, but it is very limited).  I ordered mine online from http://www.mardigrasoutlet.com/.  It's around $10 a roll, so it's kind of expensive.  I have some of the roll left, but I'm not sure if I have enough to make another wreath - I'm hoping I do.  You will also need wire or ribbon to attach the mesh, a wreath form, and any embellishments you wish to add.  I found the sparkly Trick or Treat sign at the Dollar Tree, and I made the ghost (more on him later).  The wreath form I bought was wire, but in hindsight I think I would have bought a grapevine wreath and spraypainted it black.  The mesh doesn't do a very good job of hiding the wreath form, so I had to first wrap my metal form with black tulle.   Next, I started adding strips of the mesh.  It is very forgiving, so just put it on there how you like it.  I tied my pieces on with black tulle, but you could use ribbon or wire.  Once I had my mesh on, I just hung the little sign in the middle by tying it underneath the back of the wreath, and then added my little ghost (wiring him on).  I made him using a white styrofoam ball (side note - WHY is styrofoam so expensive!?!?!?) and some cheesecloth - I just tied some purple tulle around his neck.  I hot glued some buttons on for eyes, and he was done!  I won't tell you how long I was messing with him to make him look like an actual ghost, because it's an embarassing amount of time.  Suffice it to say - I have issues.


Once he was attached, I was done!  I would have liked to have added maybe a few more little embellishments, but with the mesh being so "busy" I didn't want to get too out of control.


If you make a wreath, I would LOVE to see a picture of it!

Sharing at:

Visit thecsiproject.com


Join us Saturdays at tatertotsandjello.com for the weekend wrap up party!


Entertain Exchange

Friday, September 24, 2010

Halloween Shirts

I have always loved the look of "boutique" and custom clothes for my kids.  In the not too distant past, I used to always purchase each of them a custom made shirt or outfit for each holiday.  However, with trying to be a little a lot more frugal lately, I've had to resort to making them myself!  My first handmade shirt was Carter's birthday shirt (you can see that here).  For his shirt, I cut and attached the circle and the number 1, and then with my mom's help I sewed both on.  (For a GREAT tutorial on how to do this, visit my friend Jessica's blog - she will show you step by step how to make your own custom shirt.)

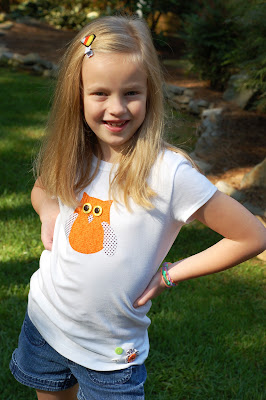
We are visiting a pumpkin patch tomorrow, so I needed to make some cute shirts for Emily and Carter quickly (Lindsey is way past wearing cutesy custom shirts - so sad but true).  I found some images online that I liked, cut them out, traced them onto some Heat n Bond, and then followed the instructions to attach them to the shirts (I couldn't find Carter a short sleeved shirt, and it is still super hot here, so I had to use a shirt he already had).  I purchased a $4 tshirt for Emily, and I had all of the fabrics already.  So, my total cost for BOTH shirts was $4!  Not bad!  My mom was kind enough to stitch around them using her sewing machine (thanks Mom!).  I used layered buttons for their eyes.  Also, for Emily's shirt, I added a few little embellishments to the bottom corner for some extra cuteness (kind of hard to see in the pictures, but there are is a little yo-yo and some cute buttons sewn on).

Here's how they turned out:


And I had to add this picture of my pretty Lindsey, even though she isn't wearing a "Mom-made" shirt - at least she wore a headband I made!


From start to finish, I think these shirts took around 2 hours to make.  I did everything but the sewing part during Carter's nap!  Easy and cute!

They will be wearing their shirts to the pumpkin patch tomorrow - pictures from that adventure coming soon!!!

Thursday, September 23, 2010

Dining Room "Reveal"

I feel kind of silly calling this a "reveal," since in actuality it's been done for awhile, but I have gotten a few emails about my dining room and I wanted to show a before and after.  Here is where we started - I had started to despise the dark color in this room, and the furniture, while pretty, was just really not my taste anymore (it was a hand-me-down set from my parents that they owned in the '80s).


Here is the after - much lighter and brighter!


 (I have NO idea why the wall outside this room looks aqua - it is not at all!  It is a very neutral beige-y color.)


 My grandmother's chandelier - LOVE it so much....


Simple window treatment - inexpensive sheers ordered online, hung with drapery clips and some hook things I found on clearance at Calico Corners.  I love the way these turned out.


Here it is at night, with candles lit.  So warm and calming.


I hesitate to share things like this because 1) I don't want anyone to think that I think my decorating is so spectacular, and 2) because I am never finished with any room, so there is never any "final" reveal - haha!  I just thought I'd share since a few people have asked to see more of this room. 

Thanks for looking!

Wednesday, September 22, 2010

Halloween Cones (yes...another Halloween project!)

I know, you're thinking I'm crazy by now - I am the most inconsistent blogger of all time, but over the past few days I've been posting like crazy, and they're ALL Halloween projects!  Well, two things - one, I'm trying to post more regularly, and two - we're crazy about Halloween!  I had this idea in my head, ever since I read this post over at Skip to My Lou (SUCH a cute blog!  You must check it out!).  Well, once I get an idea in my head, I can't help but get get it done!  I was so inspired by the cute little paper cones in this post, I just had to make some for the girls (Carter isn't really in a "things made out of paper" place right now, so he didn't get one.  I know, I'm a mean mom, but really he didn't care).

Anyway - here is what I made for Lindsey and Emily - I think they turned out SUPER cute!!!  The only supplies I needed for this were:  scrapbook paper (already had), ribbon (already had), crepe paper (purchased at Party City for $1.50) and all the little goodies inside (less than $3 for each cone).


Hmmm...I think they liked them!  Inside were some candies, Halloween Silly Bandz, pencils, and a few other little inexpensive trinkets.  It's not about how much things cost, but how you present them!


I didn't do a tutorial since I didn't take step by step pictures, but if you have any questions please feel fre to post here or email me!  I'd love to see any of your creations.

Linking up with:


Photobucket

Tuesday, September 21, 2010

Halloween Napkin Rings - Tutorial

I am busy planning my older daughter Lindsey's 12th (sob!) birthday party.  She chose a Halloween theme this year, and we sure do love Halloween, so this one is easy to plan!  I have so many fun ideas running through my head.....wait, what?  What's that?  BUDGET?  Our budget is almost ZERO?  Hmmmm....gotta get creative here.

Inspired by a FABULOUS magazine I got last year from Better Homes and Gardens (it's their Halloween issue), I decided to make some inexpensive napkin rings.  I bet you have what you need to make them RIGHT now!  If not, they are very quick and cheap to make, so let's get started!


What you will need: 
  • Thin cardboard (I used a popcorn box that was going in the recycling bin)
  • Fabric
  • Ricrac, or other embellishment of your choice
  • Hot glue gun

First cut your thin cardboard into strips.  Mine measured 7 inches by 1.5 inches.  Next, you will lay the cardboard on your fabric, and cut around the cardboard, leaving about a half inch on each side so that you can glue the fabric down.


Make sure your fabric is facing the right way!  The front of your fabric should be facing out, and your cardboard should be lying on the wrong side of the fabric.  My cardboard had the printed side of the popcorn box showing through the fabric at first, so I had to flip it over.

Next, carefully glue the sides of the fabric to your carboard.  Hot glue hurts, so watch your fingers!  I glued the two long sides, then folded the ends down like I was wrapping a present.  As you can see, the inside looks pretty messy, but that didn't really matter to me.  If it matters to you, you might want to cover the inside with some felt or something.


Now, flip your cardboard over so that you can add your ricrac or other embellishment of your choice.  I used hot glue to attach mine, but you could also use fabric glue.  I don't have patience for fabric glue, so I take my chances with finger burns.


Now, you are ready to form the napkin ring.  Coat one end of your fabric-covered cardboard with glue, and bring the other end around to attach it.  Easy!

Now, for the fun part - what to put inside?  We found these cute little skeleton pens at Party City (.49 each), so I stuck that down inside with my plasticware.


He's pretty cute, in a sorta scary way, right?


So there you have it!  A cute (and VERY inexpensive) napkin ring for your party table!  I can see these being used for years to come, and I think I'm going to make some Christmas ones as well.  You can make these for events year round, using different fabrics and trims.  Let me know if you have any questions!


Linking up with:

Photobucket

Sunday, September 19, 2010

Halloween Cupcakes (a cute way to wrap a gift!)

***EDITED***These were featured on One Pretty Thing's Halloween roundup on September 22!  So exciting!!!!

I have had these weird little white plastic containers for a long time - years maybe - and I never knew what to do with them.  I bought them on clearance at Michael's because I thought they looked like cupcake liners (and goodness knows I love anything cupcake-related).  Well, I finally figured out something to do with them.  Every year I get the girls (and now Carter!) a Halloween tshirt of some kind.  It used to be a cute custom boutique shirt, but budgets and girls getting older have changed that, so this year the shirts came from Target.  I also got them some Halloween socks and panties.  I wanted to wrap them up really cute, and then I remembered the little plastic containers.  I rolled everything together, messed around with them for a little bit, and came up with this:


Lindsey's - outer layer is a tshirt, inner layers are socks (all from Target).  Candy corn and flower came from my hairbow-making stash =)


Emily's - outer layer is a tshirt, middle layer is a pair of Halloween undies from Gymboree, top layer is a pair of socks from Target's dollar spot.


Here they are waiting for the girls to find them, along with Carter's little bucket of treats:


Real life confession (gotta keep it real here!):  Emily was SUPER jealous of Carter's bucket (from the Target dollar spot) and barely paid the cupcake any attention (she later "negotiated" with Carter and ended up taking the bucket into her room to use as a decoration).  Oh well - I LOVE these and think they are too cute!  I'm now thinking that I need to do a Christmas version as well =)


PS - does anyone know what these plastic things are called?  I'd like to get more, but I don't know how to search for them.

Linking up with:


Photobucket

Saturday, September 18, 2010

Signs of Fall....

You can't tell from the (((HOT))) weather here in Georgia, but Fall is definitely on its way!  Around our house, we couldn't be more excited - we have LOTS of fun in the fall!  Fall is definitely my very favorite time of year, and we have started decorating a little here and there.  Here are some signs that Fall is coming in our home...


Hurry up, Fall!!!!

PS - My pictures look very grainy now that I've uploaded them to Blogger - is there some setting I need to change to allow better quality pictures?  Any help would be appreciated!

Linking up with:


Photobucket